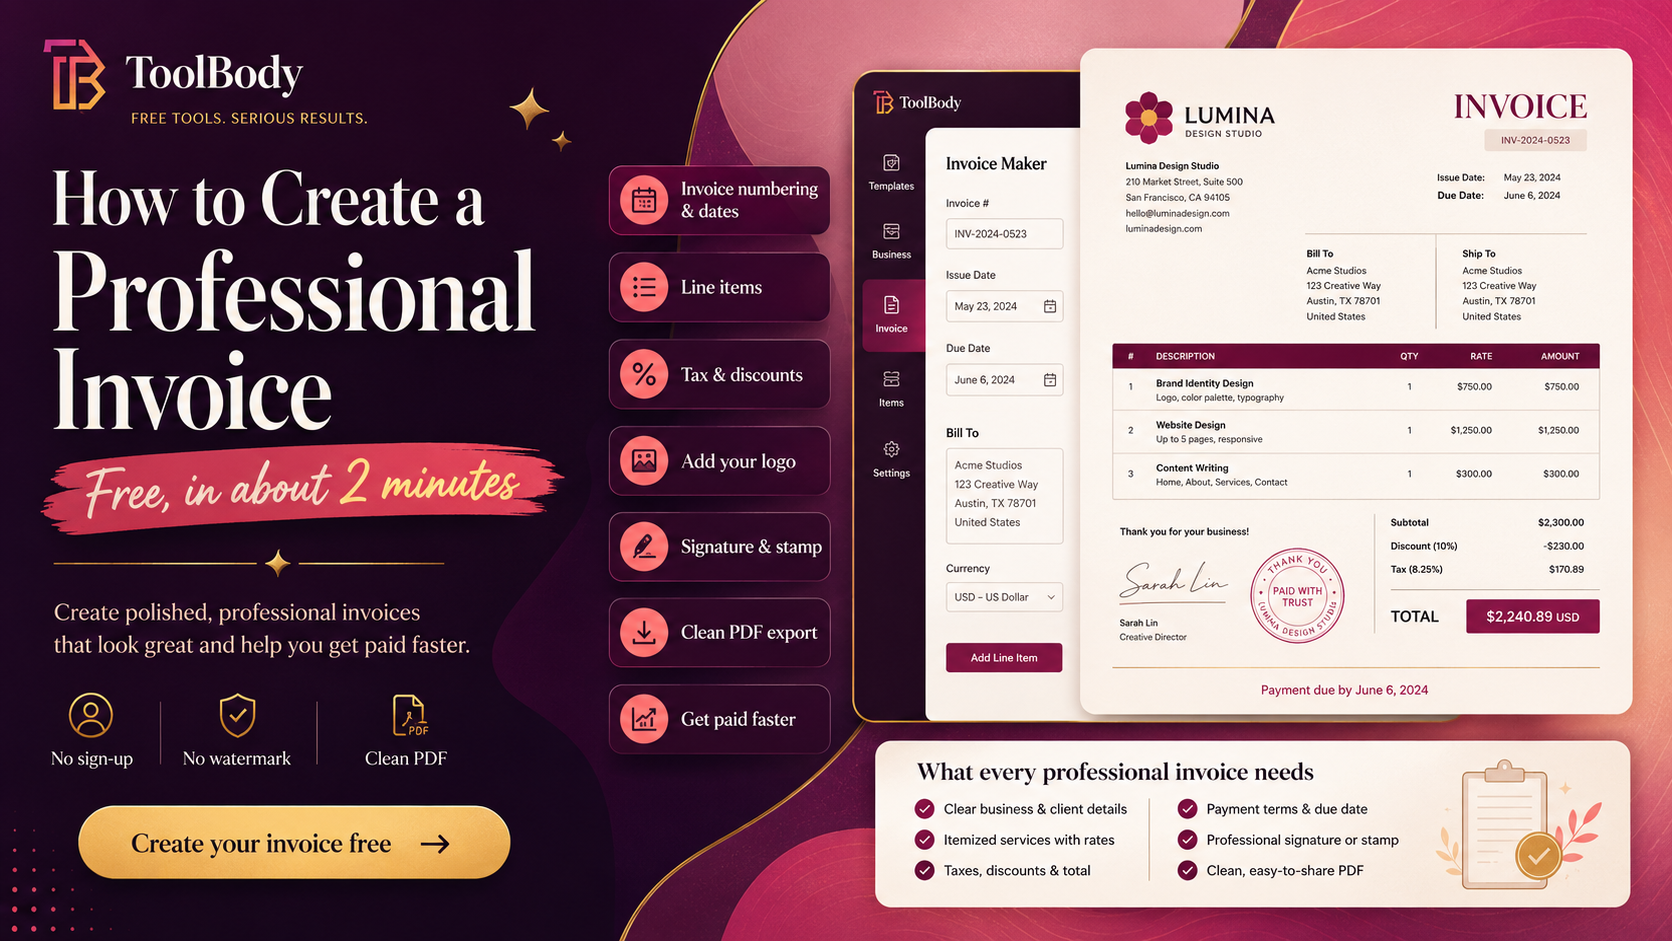
How to Create a Professional Invoice (Free, in About 2 Minutes)
Everything a professional invoice needs - numbering, line items, logo, signature, stamp - and how to build one free in 2 minutes. No sign-up, no watermark.
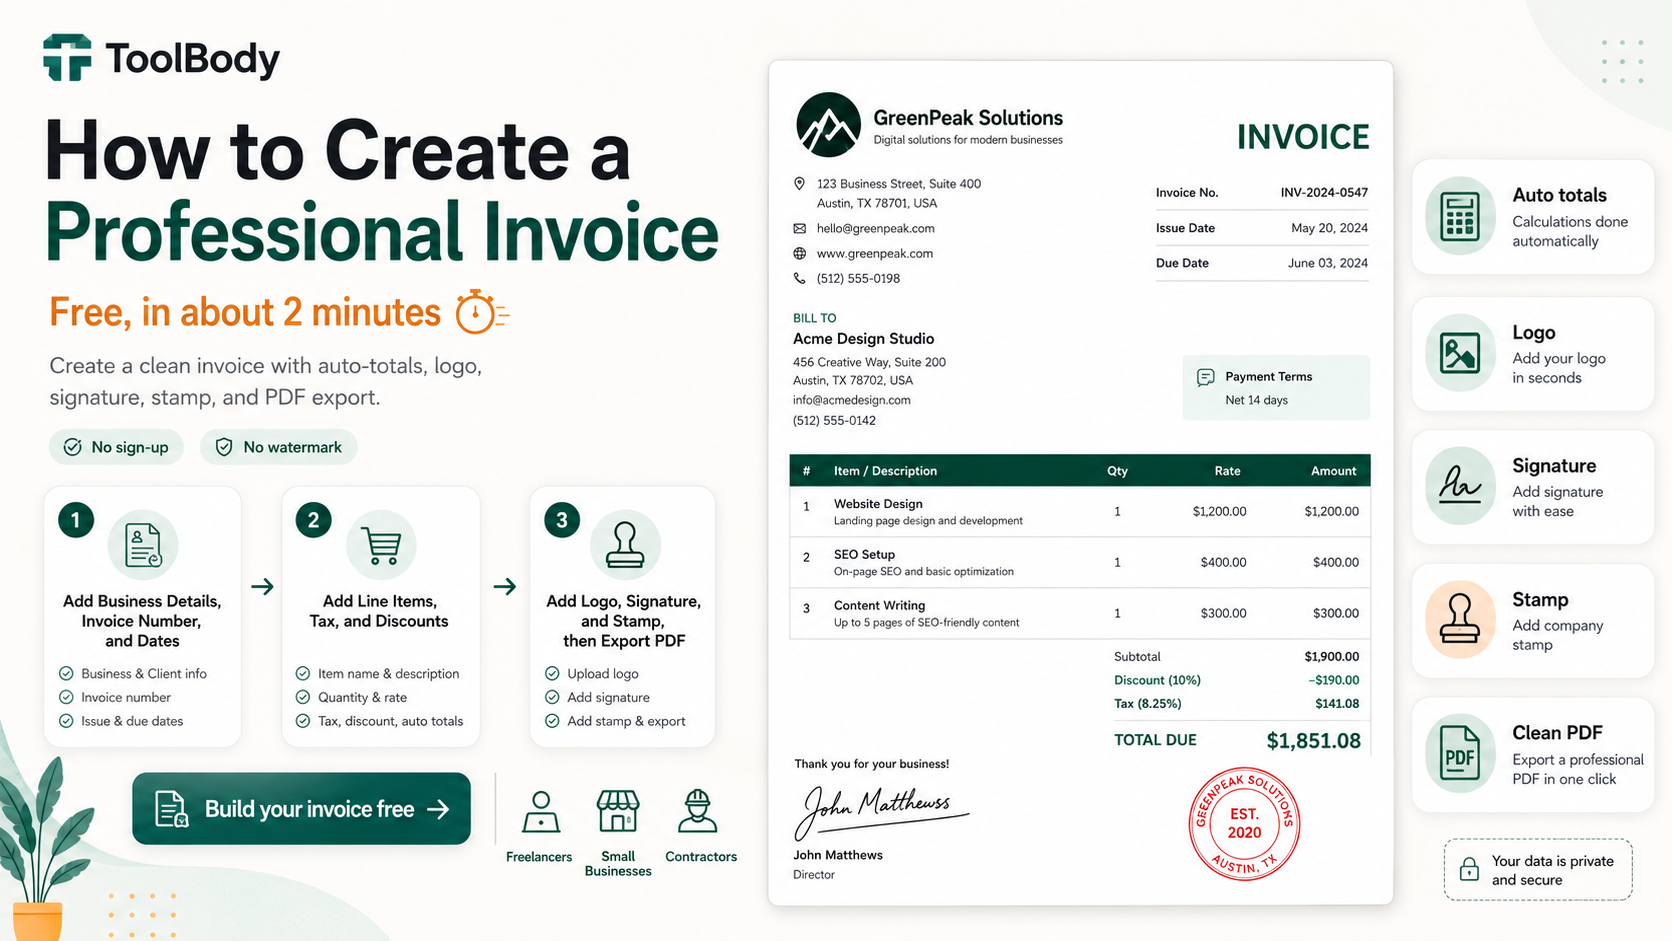
A professional invoice has eight specific elements, costs nothing to create, and takes about 2 minutes from blank canvas to finished PDF. The difference between an amateur invoice that sits in an AP team's queue for weeks and a professional invoice that gets processed within days isn't expensive software — it's knowing what to include and using a tool that handles all of it in one place.
This guide is the complete walkthrough. By the end, you'll know exactly what every professional invoice needs, how to set up numbering and payment terms correctly, how to add your logo, signature, and stamp for a polished finish, and how to get paid faster. The whole workflow uses the free invoice maker — no sign-up, no monthly subscription, no watermark on the downloaded PDF.
What every professional invoice needs
Eight essential elements. Miss any of these and the client's AP team will either delay processing while they ask you to fix it, or set the invoice aside and forget about it.
1. Your business information
Your business name (the legal entity that the client will pay)
Your address (business or registered home address)
Your email and phone for follow-up
Your tax identification number if applicable (TRN in UAE, VAT number in EU/UK, EIN in US, GST number in India/Australia)
2. The client's information
Client business name (the legal entity being billed)
Client billing address (may differ from their main office)
Specific AP contact name when possible
Their tax ID for cross-border invoicing
3. A unique invoice number
Sequential numbering (INV-001, INV-002, INV-003)
Must be unique - never reused
Legally required in many jurisdictions
4. Invoice date and payment due date
The date you're issuing the invoice
The date the client must pay by
Both clearly visible at the top
5. Itemized line items
Each service or product as a separate line
Clear description in language the client recognizes
Quantity or hours
Per-unit rate
Line total
6. Subtotal, tax, and final total
Subtotal (sum of line items before tax)
Tax line if applicable (VAT, GST, sales tax)
Final total prominently displayed
Currency clearly stated (especially for international invoices)
7. Payment terms and methods
Payment due date restated near the payment section
Specific payment methods you accept (bank transfer, PayPal, Wise, card)
Exact account details for each method (full IBAN, exact PayPal email)
Late payment policy if you have one
8. Polish elements (optional but high-impact)
Your business logo at the top
A signature near the bottom
A company stamp for visual authority
The first seven are required. The eighth is what separates an amateur invoice from a professional one. We'll cover each in detail below.
Invoice numbering and dates
Invoice numbering matters more than most people think. Done right, it helps you find any past invoice in seconds and helps clients reference invoices in payment confirmations. Done poorly, it creates accounting chaos at tax time.
Numbering systems that work
Simple sequence: INV-001, INV-002, INV-003 The default for most freelancers and small businesses. Easy to maintain, easy for clients to reference, fine for any volume of invoicing.
Year prefix: 2026-001, 2026-002 Makes tax filing easier because invoices are grouped by fiscal year. Useful if you do enough invoices per year that finding a specific one matters. Reset numbering each January.
Client code prefix: ACME-001, BETA-001 Organizes invoices by client. Useful if you work with multiple clients and want each client's invoices tracked separately. Reset numbering per client.
Combined: 2026-ACME-001 The most organized but also the most complex. Worth it only if you have many clients and need granular tracking.
Whichever system you use, stay consistent. Switching systems mid-year creates confusion in your records and the client's. Pick one and stick with it.
Critical numbering rules
Every invoice number must be unique. Many jurisdictions legally require this for tax compliance.
Never reuse a number, not even for a corrected or replacement invoice. For corrections, use a new number or append a suffix (INV-001-R).
Don't skip numbers unless you can explain why (some accountants will flag skipped numbers during audits).
Start fresh each fiscal year if you use a year prefix.
Invoice date and due date
Invoice date is the date you're issuing the invoice. Usually today's date. Some freelancers backdate slightly to align with month-end billing — that's fine within a few days but don't backdate weeks.
Payment due date is calculated from your payment terms:
Net 7 — payment due 7 days after invoice date. Used for repeat clients with good payment history or smaller amounts.
Net 14 — payment due 14 days after invoice date. The standard for freelancers and small business contractors.
Net 30 — payment due 30 days after invoice date. Standard for corporate clients with formal AP cycles.
Due on Receipt — payment expected immediately. Used for emergency work or clients with problematic payment history.
The due date is the single most important field for payment timing. Make it visually prominent — bold or in a highlighted box that the client can't miss when scanning the invoice.
Line items, tax, and discounts
The body of the invoice. This is where the client sees exactly what they're paying for.
Writing clear line item descriptions
A good line item description is:
Specific enough to be recognizable. "Web development - 20 hours" is vague. "Homepage redesign and mobile optimization, March 1-15 - 20 hours" tells the client exactly what they're paying for.
Matched to the original agreement. If you proposed "social media strategy session", invoice as "social media strategy session", not "marketing consulting". Word-for-word matching with the agreed scope removes ambiguity.
Free of internal jargon. Technical terms you use internally with your team may not be familiar to the client's AP team. Translate to language they'll recognize.
Bundled logically when sensible. If you spent 15 minutes on three small revisions, list them as one line ("Minor revisions and adjustments") not three separate items.
Quantity, rate, and line total
For each line:
Quantity or hours — the unit of measurement (hours, items, milestones)
Rate — your per-unit price
Line total — automatically calculated (quantity × rate)
The toolbody.cloud/free-invoice-maker-online">invoice maker auto-calculates line totals as you enter quantity and rate.
Tax
If you charge tax, show it on a separate line below the subtotal:
VAT (EU, UK, UAE, Saudi Arabia, etc.) — show the VAT rate (5% in UAE, 20% in UK, varies by EU country) and the calculated amount
GST (Australia, India, New Zealand, etc.) — same structure as VAT but labeled GST
Sales tax (US) — if applicable in your state for the services or goods you provide
If you don't charge tax (because you're below VAT threshold, exempt, or in a no-tax jurisdiction), don't include a tax line at all. Including a "Tax: $0.00" line creates confusion.
Discounts
If you're offering a discount, show it explicitly:
Volume discount for large orders
Early payment discount ("2% if paid within 7 days")
Loyalty discount for repeat clients
Show the discount as a negative line between subtotal and final total, with a clear label explaining what the discount is for. Hidden discounts (just lowering the rate without noting the discount) miss the chance to highlight the value you're providing.
Currency
Always state the currency explicitly. "$1,500" is ambiguous between USD, CAD, AUD, SGD, HKD, and other dollar-denominated currencies. Use "USD $1,500" or "AED 5,500" or "€1,000 EUR" — explicit and unmissable.
For international invoices especially, currency ambiguity is one of the most common causes of payment problems.
Adding your logo
Your logo at the top of the invoice does two things: it makes the invoice instantly recognizable as yours to clients who receive multiple invoices from different vendors, and it makes the invoice look professional rather than auto-generated.
How to add a logo
In the free invoice maker, find the logo upload field (usually at the top of the invoice template). Click to upload your logo file.
Logo file recommendations
Format: PNG with transparent background (preferred) or SVG (vector)
Avoid JPG — JPGs have white backgrounds that appear as a white box around your logo
Resolution: 300 DPI or higher for sharp display at any size
Proportions: roughly square or slightly horizontal works best in invoice header areas
If you don't have a logo
A business stamp serves a similar purpose without requiring a full logo design. Design one in 30 seconds using the free stamp maker — your business name in a clean round design with optional supporting details. The stamp appears on the invoice as a brand mark without needing a separate logo file.
For freelancers and small businesses just starting out, a stamp is often a faster path to "branded invoices look" than commissioning a full logo design.
Adding signature and stamp
The two elements that elevate a basic invoice to a polished professional document.
Why they matter
A signature near the bottom of the invoice — above your typed authorized signatory line — signals that a real person issued the document. The visual cue separates "an invoice from a real business" from "an auto-generated number."
A stamp adds visual authority. It identifies the business and carries the weight of "this is from a real business with formal billing practices." Particularly important for international clients in markets where stamps are expected on business documents (Middle East, Asia, parts of Europe).
How to add them
Both can be created and uploaded directly through ToolBody's three connected tools:
Design a stamp in the stamp maker — pick a shape, add your business name or upload your logo, choose colors, download as transparent PNG. Takes about 60 seconds.
Create a signature in the signature maker — draw with mouse/touchscreen or type your name in a handwriting-style font, download as transparent PNG. Takes about 60 seconds.
Upload both to the dedicated stamp and signature fields in the invoice maker. They appear automatically in the conventional positions.
For the complete workflow including positioning tips and how to choose between a company stamp and a PAID stamp, see our detailed guide on adding a signature and stamp to an invoice.
One-time setup, lifetime reuse
You design the stamp and signature once. Save the PNG files somewhere stable (your computer plus cloud backup). Every future invoice uses the same files — no need to redesign or re-create. After the initial setup, adding a stamp and signature to a new invoice takes about 5 seconds.
Exporting a clean PDF
The export step matters more than it sounds because the PDF is what the client actually sees.
What "clean PDF" means
Stamp and signature embedded as part of the document
No extra cover sheets or audit pages tacked on by e-signature platforms
No watermarks from the tool that created the invoice
Standard PDF format that opens in any viewer
Reasonable file size (under 1 MB for a typical single-page invoice)
E-signature platforms often add audit-trail pages and platform branding. Many free invoice tools add watermarks visible on the client's copy. Neither is what you want on a customer-facing invoice.
The free invoice maker exports clean PDFs with no extra pages, no watermark, and no platform branding visible to the recipient.
Naming the file
Use a consistent naming convention:
``` INV-001-ClientName-2026-06-15.pdf ```
The format makes it instantly clear what's in the file. Six months later when the client asks about a specific invoice, you can find it without searching.
Sending the file
Email the PDF to the client's AP contact with a brief professional message. The invoice itself does the work; the email just delivers it. Keep the email short — AP teams process dozens of emails a day and short ones get read.
Getting paid faster
A professional-looking invoice helps, but speed of payment depends on more than the invoice document itself.
Six practices that measurably speed up payment
1. Send the invoice the same day work is completed. Delays in your invoicing translate directly to delays in your payment. If work finishes on March 15 but you don't send the invoice until March 20, you've added 5 days to payment time before the client has even seen the invoice.
2. Send to the client's AP contact, not your day-to-day contact. Your direct contact (project manager, marketing lead, account owner) often isn't the person who processes payments. Find out at the start of any new client relationship who handles AP at their organization, and send invoices directly to them. CC your day-to-day contact for visibility but To: AP.
3. Use a clear sequential invoice number. Clients reference your invoice number in payment confirmations and accounting records. Missing or unclear numbers create back-and-forth that delays processing.
4. State the payment due date prominently. "Payment due upon receipt" is vague. "Payment due by 30 June 2026" is unmissable. The due date should be the second-most-prominent element on the invoice after the total amount.
5. Provide specific payment method details. "Send to my PayPal" is vague. "PayPal: yourname@business.com" with the exact email is specific. The fewer questions the client has to ask before paying, the faster they pay.
6. Follow up politely after the due date. Most late payments are oversight, not refusal. A polite reminder 1-2 days after the due date passes ("Just following up on invoice INV-001 — let me know if you need anything for processing") prompts most clients to process the payment immediately. Aggressive follow-ups backfire; polite ones work.
Industry benchmarks
Industry data shows the average global payment time for freelancer invoices is roughly 39 days from invoice submission to funds received, with about 29% of invoices paid late. Businesses that follow the six practices above typically see average payment times in the 14-21 day range — significantly better than the average — because their invoices remove the friction that delays processing.
Common mistakes that look unprofessional
Six mistakes that make invoices look amateur:
1. Missing or unclear invoice number. Every invoice needs a unique sequential number. Without it, the client's AP team can't reference the invoice in their records.
2. Vague line item descriptions. "Consulting services - $2,000" tells the client nothing and invites questions. Specific descriptions ("Marketing strategy consultation, March 15-20, 10 hours @ $200") communicate value.
3. Wrong currency or ambiguous amounts. "$1,500" without specifying currency causes problems for international invoices. Always state the currency explicitly.
4. Sending as Word document or image. Word documents can be accidentally edited; images can't be processed by accounting software. PDF only.
5. No payment method details. "Send payment to my bank" is useless. The client needs specific account details (bank name, IBAN, SWIFT) to process payment.
6. Sending to the wrong person. The client's AP team usually isn't your day-to-day contact. Sending to the wrong inbox adds days while the invoice gets forwarded internally.
Build your professional invoice now
Everything in this guide is free using ToolBody:
Open the free invoice maker
Fill in your business and client details
Add invoice number, dates, and line items
Upload your logo, stamp, and signature
Download as PDF and send
About 2 minutes per invoice after the first-time setup of your stamp and signature designs.
For freelancers specifically, the deeper dive on freelancer-specific considerations (payment terms, AP relationships, tax-ready records) is in our freelancer invoice guide. For the full multi-tool workflow combining invoices with stamps and signatures, see how to add a signature and stamp to an invoice.
Related guides
The free invoice maker — the tool itself
How freelancers can create professional invoices — deeper dive on freelance-specific considerations
Add a signature and stamp to an invoice — the multi-tool workflow in detail
How ToolBody works — overview of the three-tool workflow for business documents
FAQs
Every professional invoice needs: your business name and contact details, the client's business name and address, a unique invoice number, the invoice date and payment due date, an itemized breakdown of services or products with quantities and rates, a clear subtotal, any applicable tax, the final total amount due, and your accepted payment methods with specific details. Optional but recommended: your logo, a business stamp, and a signature for polish.
About 2 minutes after the first time you use the tool. The first invoice takes 5-10 minutes because you're filling in your business details, designing your stamp, and creating your signature. Future invoices reuse those elements automatically - you only need to enter client details and line items, which takes about 2 minutes per invoice.
No. The free online invoice maker handles all the standard invoice features that small businesses, freelancers, and contractors need - sequential numbering, line items, automatic tax calculation, logo upload, signature, stamp, and clean PDF export. Paid invoicing software adds features like automated payment tracking, recurring invoices, and accounting integrations that aren't essential for invoice creation itself.
An invoice is a request for payment - it's what you send to a client to bill them for work done. A receipt is proof of payment - it's what you provide after the invoice has been paid to confirm the transaction. Some businesses combine them by stamping a PAID stamp on the original invoice after payment is received, which converts the invoice into both a billing record and a payment receipt.
Use a unique sequential number for each invoice. The simplest format is INV-001, INV-002, INV-003. Adding a year prefix (2026-001, 2026-002) makes tax filing easier by grouping invoices chronologically. Some businesses add a client code (ACME-001) to organize by client. Whichever format you pick, stay consistent throughout the year and never reuse a number.
The most common terms: Net 14 (payment due 14 days after invoice date) for freelancers and small business clients, Net 30 for corporate clients with formal AP cycles, and Due on Receipt for established repeat clients or smaller amounts. State the terms clearly on the invoice and confirm them in the original work agreement so the client isn't surprised.
Yes, if you have one. A logo on every invoice builds brand recognition with repeat clients and makes your invoices instantly identifiable in their AP team's processing queue. If you don't have a logo, a business stamp serves a similar purpose - it identifies your business as the issuer without requiring a full logo design.
PDF, always. PDF looks professional, can't be accidentally edited by the recipient, imports cleanly into accounting software like QuickBooks or Xero, and opens on any device. Never send invoices as Word documents (clients can edit them), spreadsheets (less professional), or images (hard to extract data from). The free invoice maker exports as PDF by default.
Six practices that measurably speed up payment: (1) Send the invoice the same day work is completed - delays in your invoicing translate directly to delays in your payment. (2) Send to the client's AP contact, not your day-to-day contact. (3) Use a clear sequential invoice number. (4) State the payment due date prominently. (5) List specific payment method details (full IBAN, PayPal email, etc.) - no ambiguity. (6) Follow up politely 1-2 days after the due date if payment hasn't arrived. Most late payments are oversight, not refusal.
Sending invoices that look unprofessional - which usually means no logo, no signature, no stamp, vague line items, missing payment instructions, or formatting that looks like a draft. Clients process polished invoices faster because they read as legitimate business documents. Adding a logo, stamp, and signature takes about 30 extra seconds per invoice once you've designed those elements, and it measurably affects payment speed.