How to Create a Professional Invoice for Freelancers (Free)
Step-by-step guide to creating a professional freelancer invoice that gets paid faster. Free tool, no sign-up, includes all the fields clients expect.
Freelance work is half the job. Getting paid is the other half. And the bridge between the two is the invoice you send - which is either polished enough to get processed quickly, or amateur enough to delay your payment by weeks while clients ask follow-up questions.
This guide walks through exactly how to create a professional freelancer invoice that gets paid faster - what fields to include, how to structure it, how to set payment terms, and how to send it. By the end, you'll be able to produce a complete professional invoice in under five minutes using a toolbody free invoice maker, no sign-up required.
The short answer
To create a professional freelancer invoice in the fastest free way:
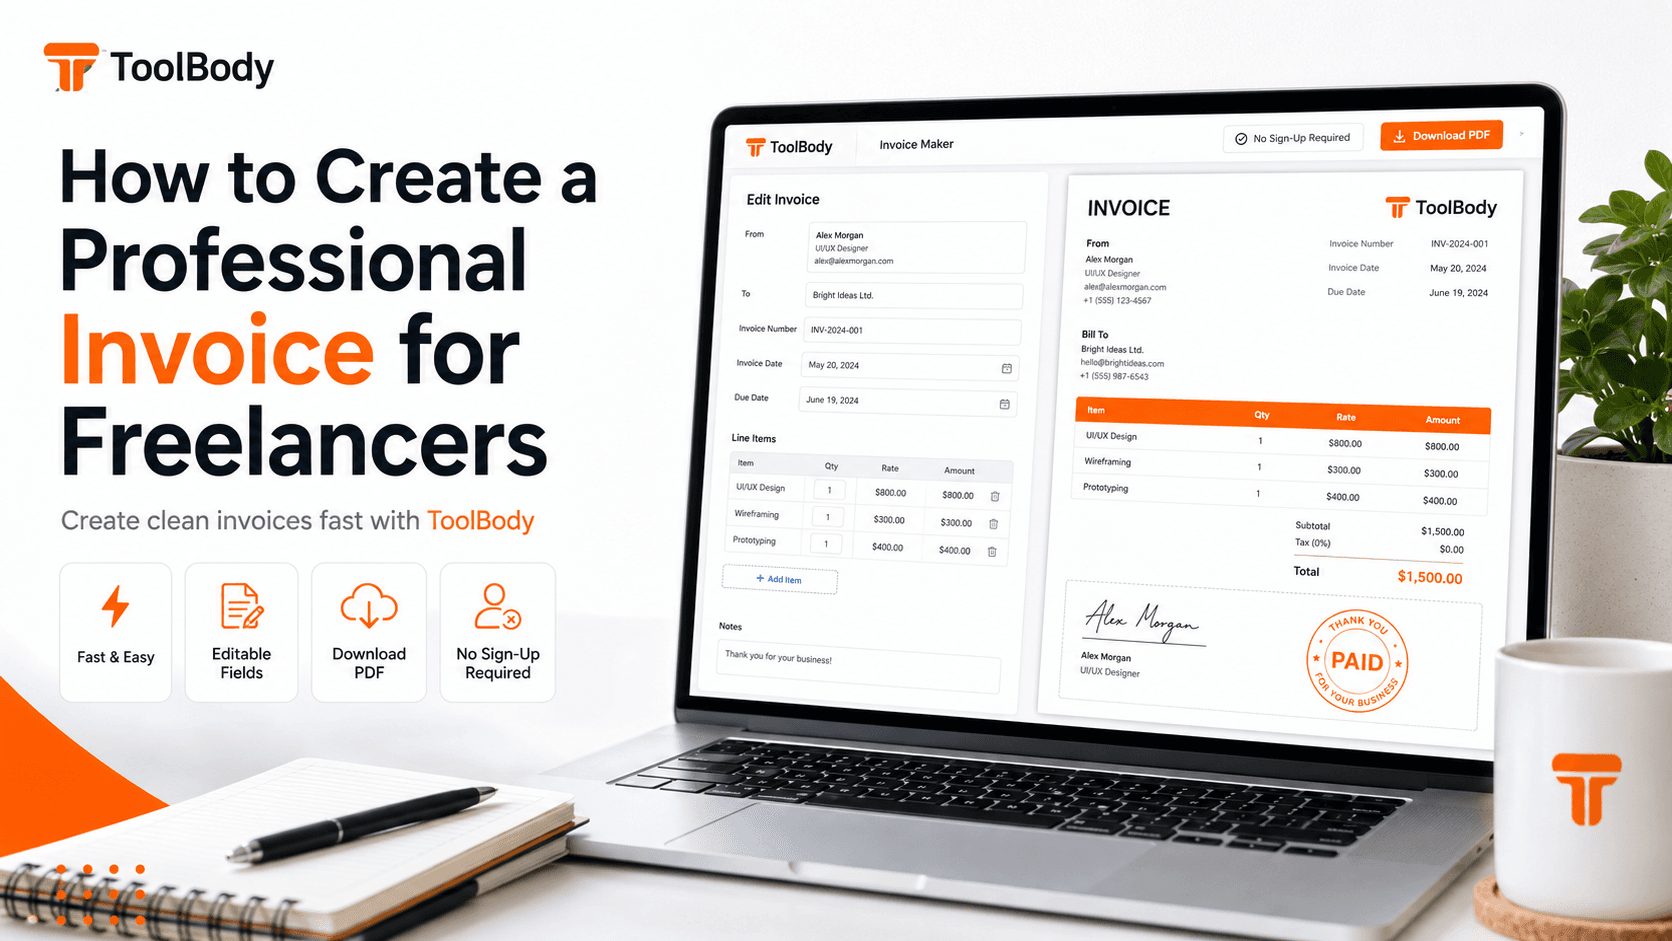
Open the free invoice maker.
Add your business information at the top (name, address, tax ID if relevant).
Add the client's business information.
Add a unique invoice number, invoice date, and payment due date.
List each service or deliverable as a separate line item with description, hours/quantity, rate, and total.
Add subtotal, tax (if applicable), and final total.
State payment terms and accepted payment methods.
Download as PDF and email to the client.
Total time: under five minutes once you've used the tool once. The rest of this guide explains every step in detail, with the trade-offs and decisions experienced freelancers make.
Why invoice quality matters more than freelancers think
Most freelancers underestimate how much the invoice itself affects payment speed. According to industry data, around 29% of freelance invoices are paid late, and the average global payment time is roughly 39 days from invoice submission to funds received. A significant portion of that delay comes from invoice problems - missing fields, unclear amounts, wrong account numbers, lack of tax IDs - that force the client's accounts payable team to ask questions or set the invoice aside.
A professional invoice answers every question upfront. The AP clerk processing it doesn't need to email you back asking what work you did, how you arrived at the total, what your tax registration number is, or where to send the payment. Everything is on the page.
The good news: making an invoice professional doesn't require expensive software. Every freelancer can produce client-ready invoices with a free invoice maker like the one at ToolBody - no account, no monthly subscription, no watermarks on the file.
What you need before you start
Your business information
Your full name or business name (whichever you use commercially)
Your address (business or home if you operate from home)
Your contact details (email, phone)
Your tax identification number if you have one (TRN in UAE, VAT number in EU/UK, EIN in US, ABN in Australia, etc.)
Your logo or business stamp (optional but recommended - see the section on professional polish below)
Your client's information
Client business name (the legal entity that will pay the invoice)
Client billing address (this may differ from their main office)
Client contact name for AP processing (often a finance manager or AP clerk, not your day-to-day contact)
Client tax ID if required by your jurisdiction (often required when invoicing across borders or for cross-VAT recovery)
The work to invoice
Description of each service or deliverable delivered in this billing period
Hours worked or quantity delivered for each item
Your hourly rate or per-item rate for each
Total amount for each line item
You don't need a fancy accounting system to gather this information - a simple spreadsheet tracking the work you've done is enough. The invoice itself is just a formatted presentation of that information.
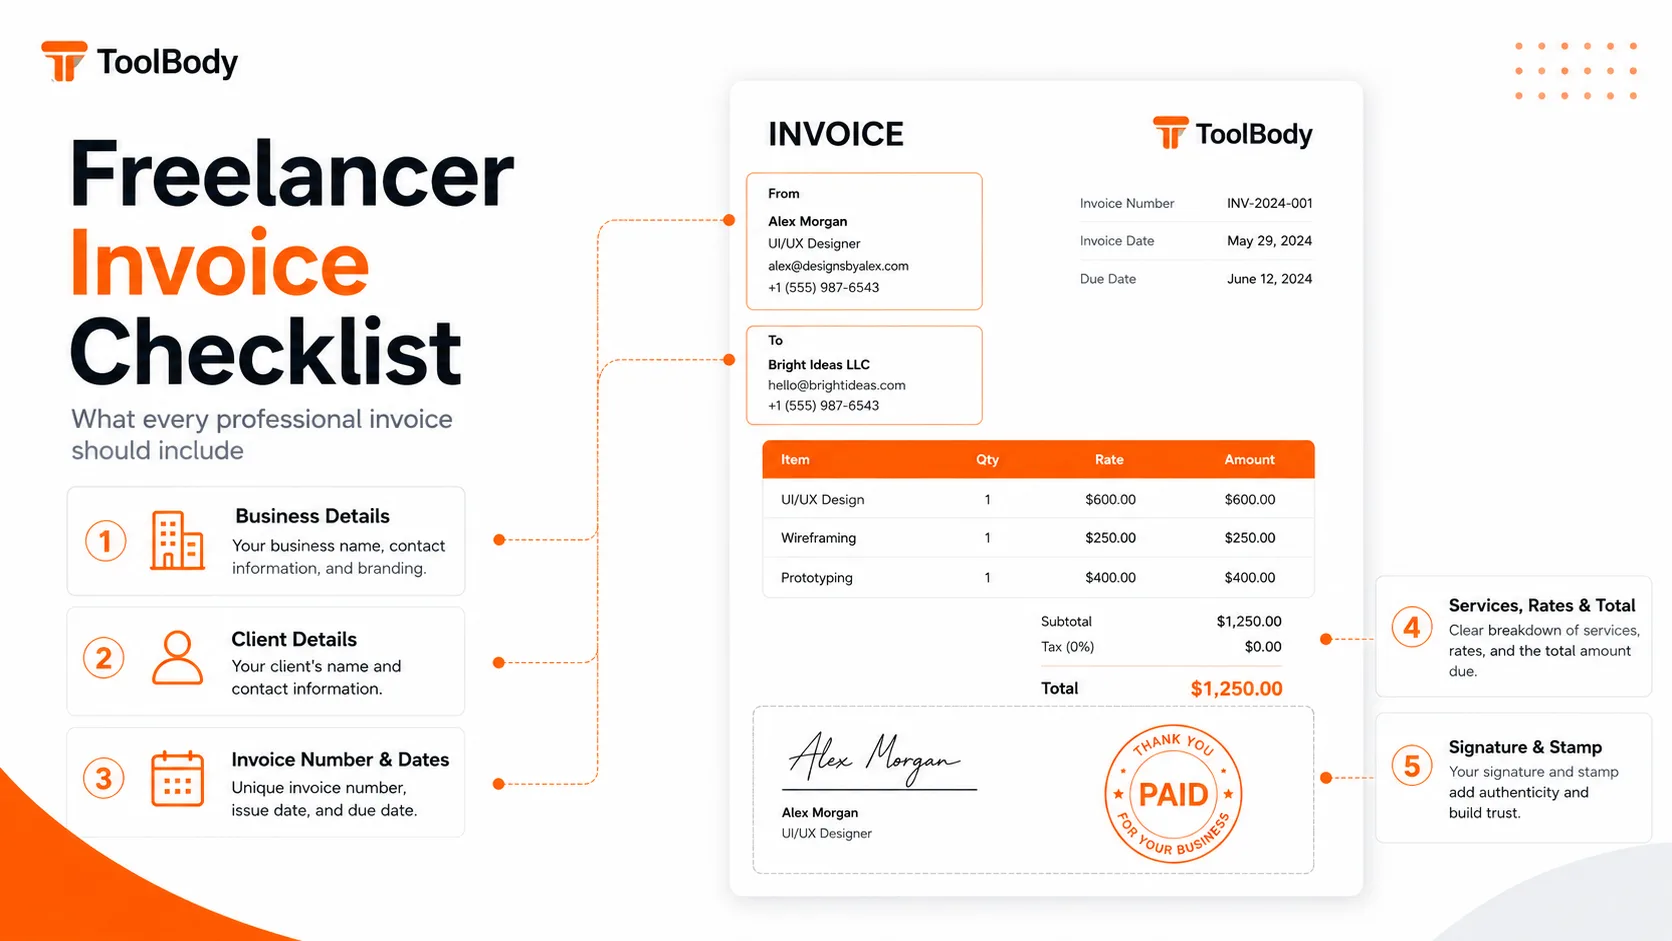
Step 1 - Add your business information at the top
The first thing the client sees when they open the invoice. Make it clean and professional.
What to include
Your full name or business name (largest text element, top-left or top-right)
Tagline (optional - "Freelance Web Developer", "Independent Marketing Consultant", etc.)
Your address on separate lines
Email and phone on separate lines
Tax identification number if applicable
Logo or business stamp on the opposite side from your name (right-side if name is left-aligned)
Format conventions
Top-left alignment is the most common for freelancer invoices. Some templates put your details top-right with the client's details top-left - either works.
Bold your business name, regular weight for everything else. The hierarchy makes the invoice scannable.
Keep contact info minimal - the client needs to be able to reach you with questions, but they don't need your social media handles on the invoice itself.
About logos
A logo isn't required but adds professional polish. It makes the invoice instantly recognizable as yours when AP processes multiple freelance invoices, and it builds brand consistency over time.
If you don't have a logo, design a simple business stamp in the free stamp maker - 30 seconds of work gives you a clean branded element you can place on every invoice. The stamp serves as a lightweight logo substitute.
Step 2 - Add the client's information
Below your business info (or to the right of it, depending on the template).
What to include
Client business name (legal entity that will receive the invoice)
Their billing address
The specific contact name in the client's AP department
Their tax ID if applicable
Why the AP contact matters
The person who hired you for the work usually isn't the person who pays you. Your direct contact might be a marketing manager, project lead, or department head, but the invoice goes to accounts payable - often a different person entirely.
When you start work with a new client, ask: "Who should I send invoices to?" Get the AP contact's name and email at the start of the engagement, not at the end when you're rushing to invoice. Sending invoices to the right inbox can shave a week off payment time.
Bill-to vs ship-to
For freelance work (services rather than physical goods), you usually only need the bill-to address. If you're delivering something physical to a different address, include a "ship-to" line below the "bill-to" details.
Step 3 - Add invoice number, invoice date, and payment due date
These three fields go in a clear block, usually top-right.
Invoice number
Use a sequential numbering system:
Simple sequence: INV-001, INV-002, INV-003. Works for everyone. Most common.
Year prefix: 2026-001, 2026-002. Makes tax filing easier by grouping invoices by year. Useful if you do enough invoices per year that finding a specific one matters.
Client code prefix: ACME-001, BETA-001, ACME-002. Useful if you work with multiple clients and want to track each separately. Reset numbering per client.
Whichever format you use, stay consistent. Don't switch numbering systems mid-year - that creates confusion in your records and the client's.
Important: every invoice number must be unique. Many jurisdictions legally require it for tax purposes. Never reuse a number, even for a corrected/replacement invoice (use INV-001-R or a new sequence number for corrections instead).
Invoice date
The date you're issuing the invoice. Usually today's date when you create the invoice. Some freelancers backdate slightly to align with month-end billing cycles - that's fine within reason but don't backdate more than a few days.
Payment due date
The date the client must pay by. Calculated from your agreed payment terms:
Net 7: due 7 days after invoice date. Aggressive but reasonable for repeat clients or smaller amounts.
Net 14: due 14 days after invoice date. The freelancer standard.
Net 30: due 30 days after invoice date. Standard for larger corporate clients with formal AP cycles.
Due on receipt: payment required immediately. Used for emergency work or clients with payment history issues.
The due date is the single most important field for payment timing. Make it bold and unmissable.
Step 4 - List services with clear descriptions
This is the body of the invoice - the line items that explain what the client is paying for.
Structure each line item with
Description: what you delivered, in language the client recognizes
Quantity or hours: the unit of measurement
Rate: your hourly rate or per-item rate
Line total: quantity × rate
Description tips
Be specific enough to be recognizable. "Web development - 20 hours" is vague. "Homepage redesign and mobile optimization - 20 hours" is specific.
Match the language to the original agreement. If you proposed "social media strategy session", invoice as "social media strategy session", not "marketing consulting".
Avoid jargon the client won't recognize. Internal technical terms work fine in your project notes but should be translated for the invoice.
Bundle small items together logically. If you spent 15 minutes on three small revisions, list them as one line ("Minor revisions and adjustments") not three.
When to break out detail vs bundle
Hourly clients usually want hour-by-hour breakdown - they need to see how you spent your time.
Project-based clients usually prefer milestone-level breakdown - "Phase 1 deliverable: $1,500" rather than every hour itemized.
Retainer clients need minimal detail - just the retainer amount with a brief description of work covered.
When in doubt, ask the client what level of detail their AP department needs. Some require itemized invoices, others prefer summarized ones.
Step 5 - Calculate subtotal, tax, and total
Below the line items, show the math clearly.
Subtotal
Sum of all line items before tax. Highlighted but smaller than the final total.
Tax line(s)
If you charge tax, show it on a separate line:
VAT (EU, UK, UAE, etc.): show the VAT rate (e.g., 5% in UAE, 20% in UK) and the calculated VAT amount.
GST (Australia, India, etc.): same as VAT but labeled GST.
Sales tax (US): if applicable in your state for the services you provide.
If you don't charge tax (because you're below VAT threshold, exempt, or in a no-tax jurisdiction), don't include a tax line - it just creates confusion.
Final total
The amount the client owes. Largest text element on the invoice. Bold, possibly in a contrasting color or in a highlighted box.
The client should be able to scan the invoice and see the total without searching for it. Make it visually impossible to miss.
Currency
State the currency explicitly - "$1,200 USD" or "AED 4,400" or "€1,000". Critical for international invoices where ambiguity costs you money. If your client is in a different country from you, also note which currency you want to be paid in (you typically use your home currency or the client's, depending on agreement).
Step 6 - State payment terms and methods clearly
Below the totals, a section explaining how and when the client should pay.
Payment due date (restated)
"Payment due by [date]" in clear text. Even though the due date appears in the header, restating it here near the payment instructions removes any possibility of misreading.
Accepted payment methods with specific details
Pick 2-3 methods you actually use and provide the details:
Bank transfer (most professional):
Bank name
Account holder name
Account number / IBAN
SWIFT/BIC for international transfers
Routing number for US
PayPal:
Your PayPal email address
Note any fee-sharing arrangement (some freelancers pass the PayPal fee to the client; most absorb it)
Wise (formerly TransferWise):
Your Wise account email or your Wise account number/details
Card payments via Stripe/Square:
A payment link if you're set up for it
Late payment policy (optional but useful)
Some freelancers include: "Invoices unpaid 14 days after due date are subject to a 1.5% monthly late fee." Decide if you'll enforce this - it only helps if you're willing to actually charge it.
A polite closing line
"Thank you for your business. Please contact me at [email] with any questions about this invoice."
This serves two purposes: it's friendly (clients appreciate it), and it gives them an easy out if they need to ask a question (which reduces the chance they just set the invoice aside).
Step 7 - Add professional polish (logo, stamp, signature)
Optional but high-impact. Three small additions that elevate a freelance invoice from "looks like a draft" to "looks like a professional invoicing document."
Logo
Your business logo at the top, opposite from your business name. Builds brand recognition with repeat clients.
Business stamp
A stamp in the bottom-right corner near the total. Could be a logo stamp, a "PAID" or "INVOICE" branded stamp, or a simple monogram. Adds traditional formality to digital invoices.
Design your stamp in 30 seconds using the free online stamp maker - upload your logo or type your business name, choose a shape, download as transparent PNG. The invoice maker has a built-in field to upload the stamp directly onto invoices.
Signature
Add your handwritten or typed signature near the bottom of the invoice, above your typed name. Makes the invoice feel like a personally-issued document rather than an auto-generated one.
Create a transparent signature using the free online signature maker - draw with mouse/touchscreen or type in handwriting fonts. The PNG drops cleanly onto the invoice.
How to add all three on ToolBody
The free invoice maker on ToolBody has dedicated fields for uploading a logo, a stamp, and a signature. Design each one in the matching tool (logo can be uploaded directly, stamp from the online stamp maker, signature from the online signature maker), then they appear on every invoice you create with the invoice maker - no need to redo them per invoice.
This stamp + signature workflow is genuinely uncommon - most free invoice tools don't support it - and it gives freelance invoices a professional finish that helps with payment speed.
Step 8 - Download as PDF and send
The format you send matters as much as the content.
Always send as PDF
PDF is the universal professional invoice format. The advantages:
Looks professional - clients open PDFs every day from suppliers, contractors, and service providers
Can't be edited accidentally by the client (some clients open Word documents and the formatting breaks)
Imports cleanly into accounting software like QuickBooks, Xero, Wafeq
Opens on every device - no compatibility issues between Mac/Windows or different Office versions
The free invoice maker exports as PDF by default.
Send by email with a brief message
Subject line: `Invoice #INV-001 from [Your Name]`
Body: ``` Hi [Name],
Please find attached invoice #INV-001 for [brief description of work, e.g., "March website development work"].
Total: [Currency Amount] Due: [Date] Payment details on the invoice.
Let me know if you need anything else for processing.
Best, [Your Name] ```
Keep it short. AP teams process dozens of emails a day - a brief professional email gets read; a long one gets skimmed and possibly missed.
Cc the relevant people
The person who hired you (so they see the work was completed and the invoice issued)
Anyone in the client's organization who manages your project (e.g., a project lead)
AP gets the To: address; everyone else is Cc
Save a copy for your records
Save the PDF locally with a clear filename: `INV-001-ClientName-2026-06-15.pdf`. Use a consistent naming convention so you can find any invoice quickly in 6 months when the client asks.
Common mistakes that delay freelance invoice payments
Mistake 1 - Missing or unclear invoice number
Every invoice needs a unique number, every time. Without it, the client's AP team can't reference the invoice in payment confirmations or accounting records.
Mistake 2 - No payment due date
"Payment due upon receipt" is vague and often gets ignored. Specify a date - "Payment due by 30 June 2026" - so there's no ambiguity.
Mistake 3 - Vague line items
"Consulting services - $2,000" tells the client nothing. They might query it before paying, adding days to the timeline. Specific: "Marketing strategy consultation, March 15-20, 2026 (10 hours @ $200) - $2,000".
Mistake 4 - Incorrect or incomplete payment details
A missing digit in the IBAN, an outdated PayPal address, a typo in the SWIFT code - any of these can delay payment by days. Double-check payment details every time you issue an invoice.
Mistake 5 - Currency confusion
For international invoices, "$1,500" is ambiguous between USD, CAD, AUD, etc. Always specify currency explicitly.
Mistake 6 - Sending as Word document or image
PDFs only. Word documents can be accidentally edited, images can't be processed by accounting software, screenshots look unprofessional.
Mistake 7 - Sending to the wrong inbox
Find out who handles AP at your client's company. Sending to your day-to-day contact often results in invoices sitting in their inbox for days before being forwarded to finance.
Mistake 8 - Late invoice submission
Send the invoice as soon as the work is complete - ideally the same day. Delays in your invoicing translate directly to delays in payment.
When to upgrade from free invoicing tools to paid platforms
A free invoice maker works for most freelancers indefinitely. Upgrade to paid tools when:
You're processing more than 30-50 invoices a month - the time saved by automation outweighs the subscription cost
You need automated payment tracking - paid platforms know when invoices are paid; free tools don't track this
You need automated late payment reminders - paid platforms send these for you
You need to integrate with accounting software - QuickBooks, Xero, Wafeq integrations are usually paid-tier features
You need multi-currency reporting or detailed tax reports - paid features
For most early-stage and mid-stage freelancers, free tools are sufficient and the subscription costs of paid platforms aren't justified. The free invoice maker on ToolBody covers 100% of what a freelancer needs to create professional invoices - the paid tools mostly add tracking, automation, and reporting features that aren't strictly necessary for invoice creation itself.
Start creating your professional freelance invoice now
Everything in this guide is free using ToolBody's online tools. Open the free invoice maker, fill in your details and line items, optionally upload a logo, stamp, and signature, then download the finished PDF. About five minutes from start to finished invoice.
If you bill multiple clients regularly, save your business details once - the invoice maker remembers your info between sessions in your browser, so you only enter the client-specific details on subsequent invoices.
Related guides
The free invoice maker - the tool itself
The online stamp maker - design a logo stamp for professional invoice polish
The free signature maker - draw or type a signature to add to invoices
How ToolBody works - overview of all three tools and how they combine on a single invoice
FAQs
A professional freelancer invoice needs your business details, the client's details, a unique invoice number, the invoice date and payment due date, clear line items with descriptions and rates, a subtotal and total, payment terms, and accepted payment methods. Optional but recommended: your logo or a business stamp, and your signature near the bottom. The format should be a clean PDF, not a Word document or spreadsheet.
Yes. You can create a fully professional freelance invoice using a free invoice maker like the one on ToolBody. There's no sign-up, no daily limit, no watermark on the PDF. You fill in your details, the client's details, and the line items, then download the finished invoice. Most freelancers don't need a paid invoicing platform until they're processing high invoice volumes or want automated payment tracking.
Use a sequential numbering system. The simplest is INV-001, INV-002, INV-003. Adding a year prefix (2026-001) helps at tax time by grouping invoices by fiscal year. Some freelancers add a client code (ACME-001, ACME-002) to organize by client. The format doesn't matter as much as consistency - every invoice needs a unique number you'll reference in payment confirmations, follow-ups, and tax filings.
Net 14 days (payment due 14 days after invoice date) is the most common term for freelancers. Net 30 is common for corporate clients with formal AP processes. Net 7 or 'Due on receipt' is reasonable for established repeat clients or smaller invoices. Whatever you pick, state it clearly on the invoice and confirm it in the original work agreement. Don't surprise clients with terms they haven't agreed to.
Not required, but it helps. A logo makes the invoice instantly recognizable as yours, builds the impression that you're a proper business rather than a one-off, and creates brand consistency across documents you send to the same client over time. If you don't have a logo, a business stamp with your name or company name works as a simpler alternative - design one for free in the online stamp maker.
It's not legally required but adds a professional finish. A signature near the bottom (typed name plus an image of your signature) makes the invoice feel like a properly issued business document. A stamp - either a logo stamp or a 'PAID' or 'INVOICE' branded stamp - adds visual polish. Create a transparent signature in the free signature maker and a stamp in the free stamp maker, then upload both into the invoice maker.
PDF. Always. PDFs look professional, open on any device, can't be accidentally edited by the client, and import cleanly into the client's accounting software. Never send a Word document (clients can edit it), a spreadsheet (less professional), or an image (hard to extract information). The invoice maker exports as PDF by default.
For low volumes (under 10 invoices a month), a simple spreadsheet works - one row per invoice with date sent, due date, amount, and payment status. For higher volumes, a paid invoicing platform with payment tracking is worth the cost. ToolBody's invoice maker is free and great for creating invoices, but doesn't track payments - pair it with a spreadsheet or paid accounting software for the tracking layer.
List only methods you actually accept and can verify. Common options: bank transfer (most professional, lowest fees), PayPal (fast but charges fees), Wise (good for international payments), Stripe (good for card payments). For each method, include the specific details the client needs - your IBAN for bank transfer, your PayPal email, etc. Don't list every possible method - 2-3 well-explained options work better than 6 vague ones.
Send a polite payment reminder 1-2 days after the due date passes - most late payments are clients being busy, not refusing to pay. If no response, follow up weekly with increasing formality. After 30 days overdue, send a formal demand letter referencing your original agreement and the unpaid invoice. After 60 days, consider a small-claims court filing or a debt collection service. Most invoices get paid by the first or second reminder.