How to Add a Signature and Stamp to an Invoice (Built-In, No Extra Tools)
Use an invoice template with built-in signature and stamp fields - skip the juggling of 3 separate tools. Free, no sign-up, finished PDF in 5 minutes.
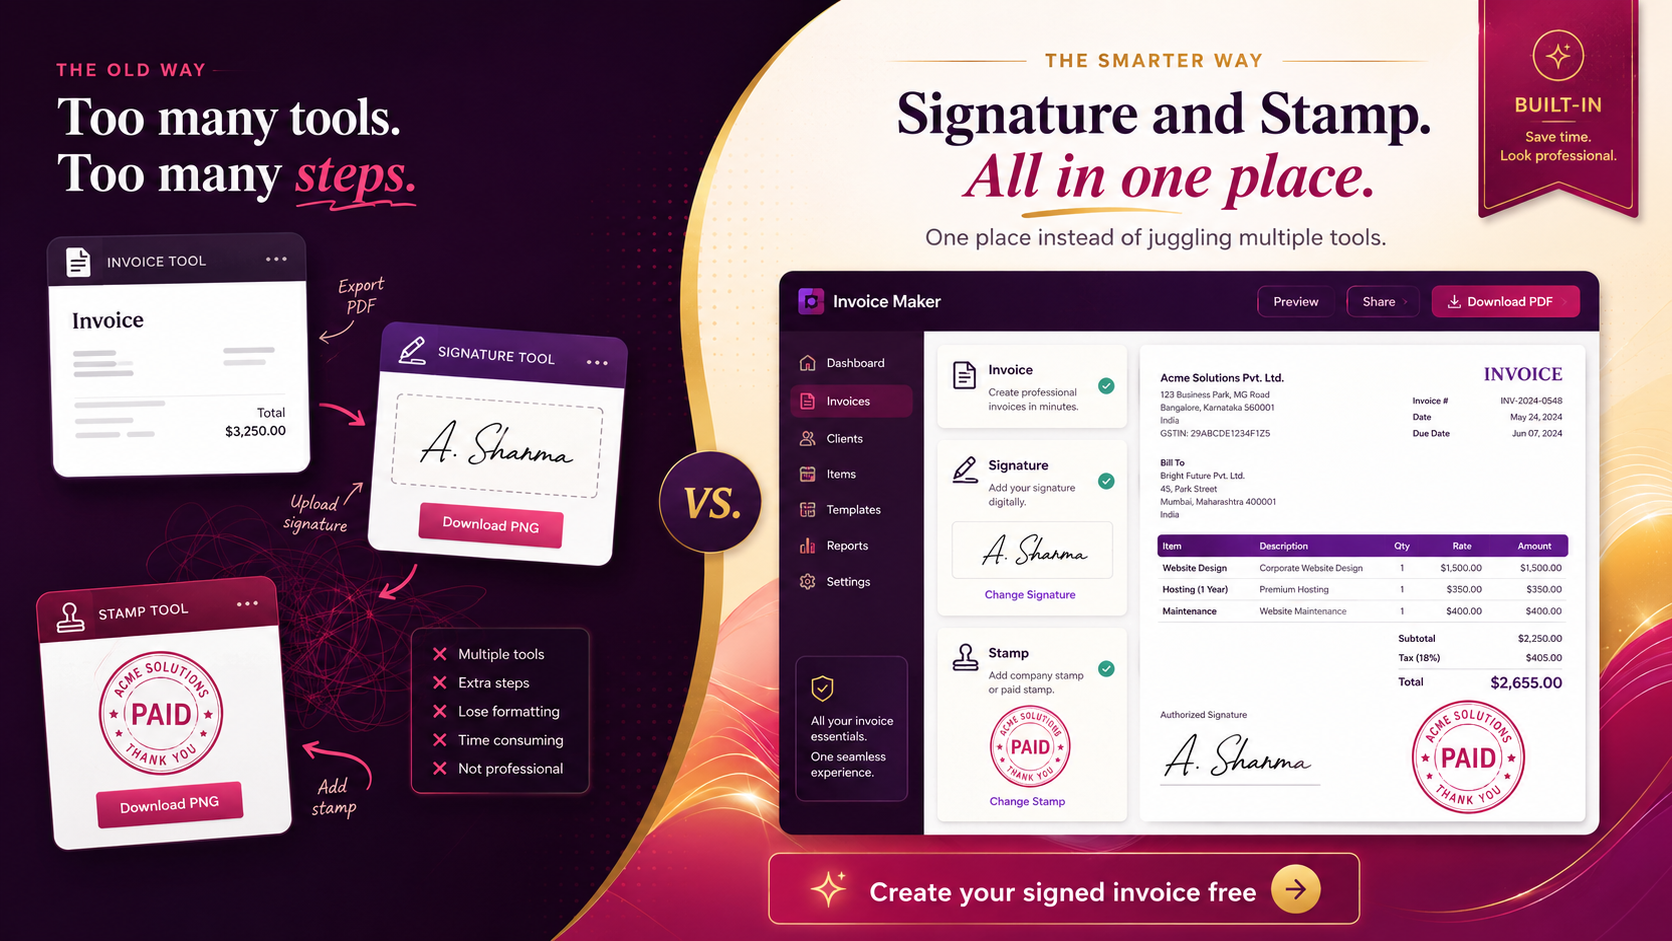
Most invoice tools handle invoice creation and stop there. If you want to add a stamp or signature, you're on your own — open a design tool to make a stamp, sign up for an e-signature platform to capture your signature, then juggle PDF files between the three tools to assemble the final document. It's expensive, slow, and the result often looks like three different documents stitched together because none of the three tools knew what the others were doing.
There's a better way. An invoice template with signature and stamp fields built directly into the toolbody.cloud/free-invoice-maker-online">invoice maker — design once, upload once, and every future invoice carries both elements automatically. No juggling, no separate subscriptions, no format incompatibilities. This guide walks through exactly how this works in the free invoice maker and why doing it in one place beats the usual three-tool workflow.
Why add a signature and stamp to an invoice
Before walking through the workflow, it's worth understanding what these two elements actually do for an invoice.
A signature on an invoice
A signature near the bottom of an invoice — above the typed authorized signatory line — signals that a real person issued the document. The visual cue separates "an invoice from a real business" from "an auto-generated number on a spreadsheet."
In commercial practice, signatures on invoices serve three roles:
Personalization — clients dealing with you remember the human, not just the company name
Authorization — the signature implies someone with authority issued the invoice (especially relevant for larger businesses where AP teams want to know the document went through proper channels)
Polish — visually, signed invoices look more finished than unsigned ones
For freelancers and small businesses, the signature is almost always the business owner's own. For larger businesses, it might be the finance manager or whoever's authorized to issue billing documents.
A stamp on an invoice
A stamp on an invoice — typically positioned near the totals or signature area — adds a different kind of authority. The stamp identifies the business and carries the visual weight of "this is an official document from this entity."
Stamps on invoices serve three roles too:
Branding — a logo stamp keeps your brand in front of the client every time they look at an invoice
Authority — the stamp signals "this is from a real business with formal billing practices"
Workflow status — stamps like PAID or APPROVED FOR PAYMENT mark the invoice's status visually
The first two reasons apply to any invoice you issue. The third applies once you start receiving payments and want to mark invoices as paid for your records.
Combined effect
A signed and stamped invoice reads as a complete professional billing document. The AP team processing it doesn't need to wonder if it's a draft, a quote, or a final invoice. It looks like a finished piece of business correspondence, and gets treated as one.
International clients especially expect the signed-and-stamped finish — in many markets (Middle East, parts of Asia and Latin America, much of Europe), unsigned and unstamped invoices read as unprofessional or even suspicious.
The usual painful workflow
Most people who want signed and stamped invoices end up with this workflow:
Tool 1 — Paid invoice software
Sign up for QuickBooks, FreshBooks, Wave Pro, Zoho Invoice, or similar. Pay $15-30 per month. Configure your business details, customize the invoice template, fill in line items, generate a PDF.
The invoice tool produces a clean invoice but doesn't include built-in stamp or signature fields beyond the most basic options (most don't let you upload custom stamps at all; signatures are usually limited to typed text in a designated line).
Tool 2 — E-signature platform
Sign up for DocuSign, Adobe Sign, HelloSign, or similar. Pay $15-25 per month. Upload the invoice PDF from Tool 1. Drag a signature field onto the PDF where you want the signature to appear. Sign the field. Download the signed PDF.
This adds a signature but creates new problems: the e-signature platform's UI is built for contracts, not invoices, so positioning the signature in the right place is awkward. The signed PDF often has extra audit-trail pages tacked on that you don't want on a customer-facing invoice.
Tool 3 — Design or stamp tool
Open Canva (free for basics, $12/month for Pro features), Adobe Express, Photoshop, or hire a designer ($50-200 per stamp design). Create a company stamp. Export as PNG.
Then back to Tool 2 or a separate PDF editor to overlay the stamp PNG onto the signed PDF from Tool 2. Hope the positioning works. Hope the format is compatible. Hope the file size doesn't explode when you combine everything.
Total monthly cost
Invoice software: ~$25/month
E-signature platform: ~$15/month
Design tool subscription: ~$12/month
Combined: $52/month, or $624/year, just to issue invoices with stamps and signatures.
Total time per invoice
Create invoice in Tool 1: 5 minutes
Export, upload to Tool 2, position signature, sign, download: 5-10 minutes
Switch to Tool 3, find your stamp, position on PDF, save: 5-10 minutes
Combined: 15-25 minutes per invoice of the assembly work, on top of the actual invoice content.
This is the workflow that millions of businesses tolerate because they assume there isn't a better way. There is.
Doing it in one place with ToolBody
The free invoice maker on ToolBody handles all three elements in a single workflow. Three free tools — stamp maker, signature maker, invoice maker — designed to work together as one combined system.
The complete workflow:
Design your stamp once in the free stamp maker — about 60 seconds.
Create your signature once in the free signature maker — about 60 seconds.
Open the invoice maker, fill in your business details and line items, upload the stamp and signature to the dedicated fields — about 3 minutes.
Download the finished invoice as PDF with both elements embedded.
Total monthly cost: $0. Free, no sign-up, no daily limits, no watermarks.
Total time per invoice (after first setup): 2-3 minutes. The stamp and signature are designed once and reused on every invoice forever.
The reason this works: the three tools are aware of each other. The stamp maker exports in a format the invoice maker accepts natively. The signature maker does the same. The invoice maker has dedicated upload fields specifically for these two elements. There's no juggling because the system is designed for the combined use case.
This three-tool integration is genuinely unusual. Most free invoice tools don't have stamp or signature support at all. Most stamp tools don't have invoice support. Most e-signature platforms don't have stamp or invoice support. ToolBody is built around the assumption that small businesses need all three together, not separately.
Step-by-step: how to use the built-in fields
The full workflow, end to end.
Step 1 — Open the invoice maker
Go to the invoice maker in your browser. No sign-up needed. The interface opens with empty fields ready to fill in.
Step 2 — Fill in your business information
At the top of the invoice template:
Your business name (or your name if you're a sole trader)
Your address (business or registered home address)
Your contact details (email, phone, optionally website)
Your tax identification number if applicable (TRN in UAE, VAT number in EU, EIN in US)
The invoice maker remembers these details in your browser session, so you only enter them once. Future invoices auto-populate this section.
Step 3 — Add the client's information
Client business name
Client billing address
Client tax ID if relevant for cross-border invoicing
Specific AP contact name if you have one
Step 4 — Add invoice number, dates, and line items
Invoice number (sequential — INV-001, INV-002, etc.)
Invoice date and payment due date
Each service or product as a separate line item with description, quantity/hours, rate, and total
Subtotal, tax (if applicable), and final total
Step 5 — Design and upload your stamp
If you don't have a stamp PNG already:
Open the stamp maker in a new browser tab.
Pick a shape (round is most common for business stamps).
Add your business name, optionally upload your logo as the center element.
Choose stamp color (blue is professional, black is formal, red is for high-attention workflow stamps).
Download as transparent PNG.
Then in the invoice maker, click the Stamp upload field and select your PNG. The stamp appears on the invoice in the conventional position near the totals or signature area.
Step 6 — Create and upload your signature
If you don't have a signature PNG already:
Open the signature maker in a new tab.
Either draw your signature with mouse or touchscreen, or type your name in a handwriting-style font.
Pick stroke thickness (medium) and color (blue or black).
Download as transparent PNG.
Then in the invoice maker, click the Signature upload field and select your PNG. The signature appears in the bottom-right area of the invoice, above your typed name.
Step 7 — Review and download
Look at the finished invoice. Check:
All business and client details correct
Invoice number, dates, and line items accurate
Stamp clearly visible and positioned correctly
Signature visible above the typed authorized signatory line
Total amount unmissable
When everything looks right, click Download and select PDF format. The downloaded file has the stamp and signature embedded — the recipient sees the document exactly as you do.
Choosing a 'Paid' stamp vs a company stamp
A common question: should the stamp on the invoice be a company stamp or a workflow stamp like PAID? The answer depends on the invoice's status.
Use a company stamp when
You're issuing the invoice to the client for the first time
The invoice is the formal billing document
You want the stamp to identify your business as the issuer
A company stamp goes in the lower-right area of the invoice, near the signature. It serves as a brand mark and authority signal. This is what the stamp field on most invoices is designed for.
Use a Paid stamp when
The invoice has already been paid by the client
You're updating the invoice copy for your records or providing the client a paid receipt
You want the stamp to mark the payment status visually
A Paid stamp typically goes diagonally across the invoice or prominently over the totals area. It's an overlay mark, not a header element. The visual purpose is to say "this is done" at a glance.
Use both on different copies
Many businesses keep both stamps in their library:
The company stamp on the customer-facing invoice when first issued
A Paid stamp added to the invoice copy in your internal records once payment has been received
You don't need to choose between them at design time. Design both in the stamp maker, save both PNGs, and upload whichever fits the current invoice's status.
What about other workflow stamps?
The same approach applies to APPROVED, RECEIVED, DRAFT, VOID, CANCELLED, and similar workflow stamps. Each is a separate PNG you design once and apply to invoices as their status changes through the AP workflow. The office workflow stamp templates cover all the standard workflow stamps with the right colors and conventions for each.
Downloading the clean PDF
The download step matters more than it sounds.
What "clean PDF" means
A clean invoice PDF has:
The stamp and signature embedded as part of the document
No extra cover sheets, audit pages, or e-signature platform branding
No watermarks from the tool that created it
Standard PDF format that opens in any viewer
Reasonable file size (under 1 MB for a typical single-page invoice)
E-signature platforms often add audit-trail pages that show signing history, IP addresses, and platform branding. Free invoice tools sometimes add watermarks visible on the customer's copy. Neither is what you want on a customer-facing invoice.
The export step
In the invoice maker, click Download and select PDF. The export is clean — no extra pages, no watermark, no platform branding on the document the client sees.
Save the PDF with a clear filename: `INV-001-ClientName-2026-06-15.pdf`. Consistent naming helps when you need to find a specific invoice six months later.
Sending the PDF
Email the PDF to the client's AP contact with a brief professional message:
``` Hi [Name],
Please find attached invoice #INV-001 for [brief description].
Total: [Currency Amount] Due: [Date] Payment details on the invoice.
Let me know if you need anything for processing.
Best, [Your Name] ```
The invoice does the work. The email just delivers it.
A note on file management
Once you've designed your stamp and signature PNGs, save them somewhere stable:
Local copy on your computer in a "Business Documents" folder
Cloud backup in Google Drive, Dropbox, iCloud, or OneDrive
Phone copy in your phone's cloud storage so you can access from anywhere
The PNG files are the source artifacts. The invoice maker remembers them in your browser session, but if you switch devices or clear browser data, you'll need to re-upload from the saved files. Cloud-stored copies make this a non-issue.
The bigger picture
The combined workflow this guide describes is the same workflow used by businesses paying $40-60/month for the equivalent capability across three separate tools. The difference is that the free invoice maker on ToolBody bundles them into one place — at no cost.
For freelancers, small business owners, and office admin teams handling everyday invoicing, this is genuinely a category-changer:
No subscription fees eating into already-thin margins
No tool-juggling overhead consuming hours per week
Consistent visual output because all three elements were designed to work together
Faster turnaround from "work done" to "invoice in client's inbox"
For more on the broader invoice strategy — what to include, how to number, how to set payment terms — see our companion guide on how to create a professional invoice.
Start using the built-in fields now
The whole free workflow lives at ToolBody:
Design your stamp in the stamp maker
Create your signature in the signature maker
Build your invoice with both built in at the invoice maker
The first invoice takes about 5 minutes from blank canvas to downloaded PDF. Every future invoice takes 2-3 minutes because the stamp and signature are already designed.
Related guides
The free invoice maker — the tool with built-in stamp and signature support
The free stamp maker — design your business and workflow stamps
The free signature maker — create a transparent signature PNG
How to create a professional invoice for freelancers — the broader strategy guide on invoicing
FAQs
It's an invoice template that includes dedicated upload fields for both a company stamp (or workflow stamp) and a signature, so you don't have to add them as separate steps after creating the invoice. You design the stamp and signature once, upload them to the template, and every future invoice you create with the same template can include both - no PDF editing or manual image insertion required.
The usual workflow uses paid invoice software ($15-30 per month), a paid e-signature platform ($15-20 per month), and a separate design tool for stamps ($12+ per month for Canva Pro, or paying a designer). Combined, that's $40-60 per month, plus the time spent exporting from each tool and combining the outputs. Doing it in one place is faster, cheaper (free), and produces a cleaner result because the three elements were designed to work together from the start.
Yes - but it takes about 60 seconds for each. The stamp maker creates your stamp PNG; the signature maker creates your signature PNG. Both download as transparent files that drop cleanly into the invoice maker's upload fields. You only do this once - the same PNG files work on every future invoice.
Yes. Many businesses keep more than one stamp - a company seal for formal invoices, a PAID stamp for marking completed invoices, an APPROVED stamp for internal workflow. Each is a separate PNG file you can swap in and out of the invoice maker's stamp field depending on which one fits the purpose of the current invoice.
A company stamp identifies the business that issued the invoice - it carries your business name, logo, or contact information. A Paid stamp marks the status of the invoice itself - it indicates the invoice has been paid. Both can appear on the same invoice in different roles: the company stamp near the signature area as a brand mark, the Paid stamp overlaid on the totals when payment has been received. For a freshly issued invoice, you usually only use the company stamp; the Paid stamp comes later after payment.
Yes. The invoice exports as a PDF with the stamp and signature fully embedded as part of the document. Anyone who opens the PDF - in any viewer, on any device - will see both elements exactly as they appear in the invoice maker. The recipient doesn't need any special software to view them.
If the PDF is flattened on export (which is the default), the stamp and signature are baked into the document and can't be easily modified by the recipient without specialized PDF editing software. This makes the stamped and signed invoice reasonably tamper-resistant for casual recipients. For legally tamper-evident signing, use a regulated e-signature platform - image stamps and signatures aren't cryptographically authenticated.
Yes - that's the whole point. Once you've designed your stamp and signature PNGs, save them on your computer or in cloud storage. Every future invoice uses the same files. The invoice maker also remembers your uploads in your browser session, so you don't even need to re-upload them when creating consecutive invoices.
For everyday commercial invoicing, yes - signature images on invoices are widely accepted as evidence that the business issued the invoice. The invoice itself is a billing document, not a contract, so the signature serves more as professional polish than legal authentication. For high-stakes documents requiring cryptographic e-signatures (contracts, regulated filings), use a dedicated e-signature platform instead. For standard freelance and SMB invoicing, the image approach is the practical choice.
No. The free invoice maker, stamp maker, and signature maker all work without sign-up, without account creation, and without watermarks on the downloaded files. You can create a complete signed and stamped invoice without ever giving an email address. Browser-based, no install, no daily limits on free use.